BibleReader 5 Annotations: Part One — Highlights
This is the first of a three-part series of articles discussing annotations in Olive Tree’s BibleReader software. As of this article, BibleReader is currently at version 5.0. If you are unfamiliar with BibleReader, a very nice Bible study/reading app that runs on Apple iOS devices, you may want to take a look at an introductory video first. In BibleReader, annotations are used to add emphasis to text selections in one of three ways — highlighting, attaching notes, or saving a location for easy retrieval.
In BibleReader, annotations add emphasis to text selections in one of three ways:
- Highlights
- Notes
- Bookmarks
To kick this series off, we’ll examine how highlights can be created, edited, and organized in BibleReader. The image below is part of an iPad screen capture. Its caption sets the stage for the tutorial information that follows.

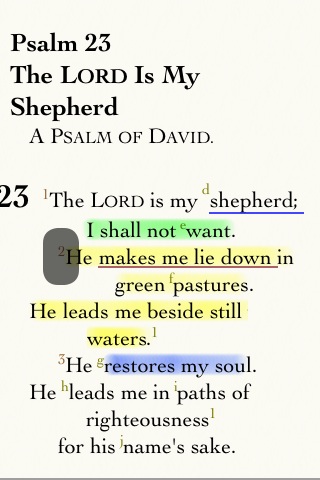
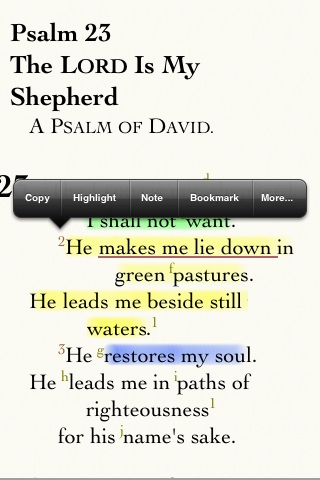
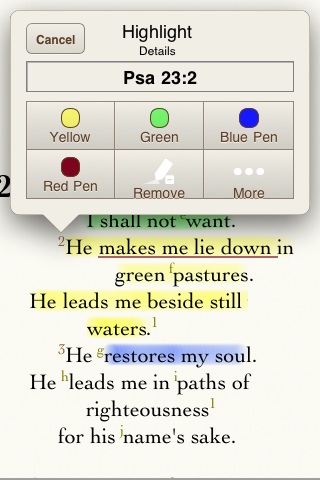
Method One: Creating Whole Verse Highlights
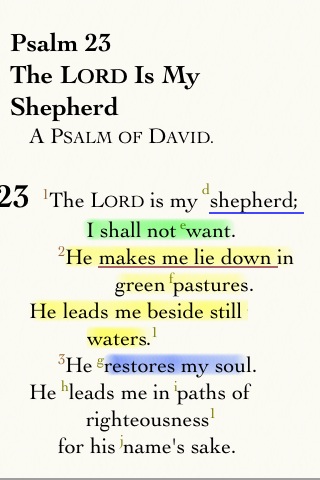
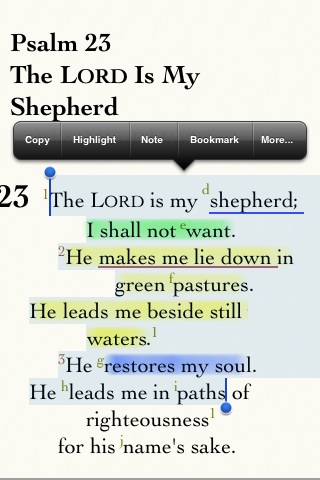
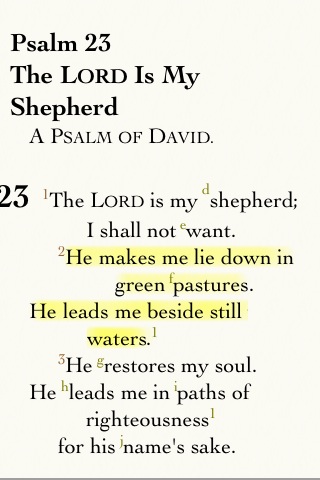
Highlighting an entire verse couldn’t be easier. Advance through each of images below to see a virtual walk-through — how to highlight verse twenty-five.
[album: http://richimages.net/Albums/CreatingHighlights/ |width=640|height=640|photo_count=1|title_prefix=“Adding Custom Highlight Styles”|thumbnail_padding=0|thumbnail_size=40| ]
Method Two: Creating Specific Text Selection Highlights
As of version 5.0, BibleReader is no longer restricted to whole-verse-only highlighting. Highlighting specific text selections are now possible, whether they are verse portions, or even non-scripture related selections.

Viewing Differences in Whole-Verse Highlights and Specific Text Highlights
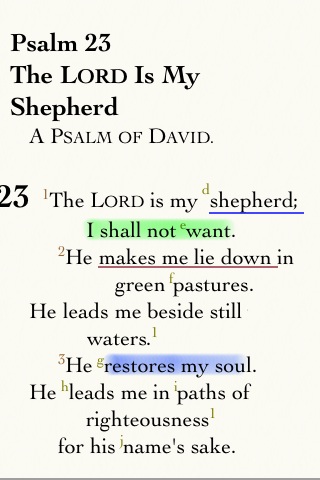
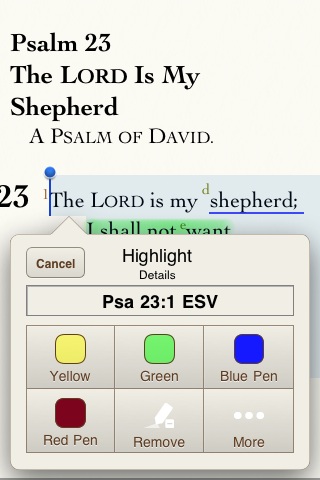
If you use method one to create a whole-verse highlight, the highlight will be visible for any Bible translation opened to that location. Therefore, these highlights can be thought of as any-translation-highlights, or global highlights. Highlights created using method two for more defined portions of text can only be seen in the Bible translation from which it was created. Obviously, it would be impossible for a software algorithm to match a portion of text from one translation to another. Therefore, a specific highlight will only be shown for the translation from which it was created. In the above example, the green highlight will only be seen in the ESV translation. Furthermore, the default title given to the highlight will append the source translation to the reference. For our example above, the default title of the saved highlight is P s 23:1 ESV
Removing Highlights
Removing a highlight is just as easy as procedure use to create it. The only thing you really need to remember is to use the same selection method used to create the highlight you wish to delete. I.e. if you taped the verse label to create a whole-verse highlight, then that’s the way you start off removing it. If you selected specific text directly, then that will be the way you start off removing that same highlight. We’ll demonstrate these details more specifically in the following tutorial.

Tip: A Good Use for Partial Highlighting

Adding Custom Styles
The software comes with six predefined highlighter styles; more can be added. The following images walk through the process adding a custom highlight style — a underline style we’ll save with the name, Blue Pen. The last image shows a verse that has two highlighter styles applied to it — the default yellow stroke and our newly created Blue Pen underline. If you don’t want to walk through this tutorial, you may want to just take a look at the final results. The software is incredibly intuitive.
[album: http://richimages.net/Albums/AddingCustomStyles/ |width=640|height=640|photo_count=1|title_prefix=“Adding Custom Highlight Styles”|thumbnail_padding=0|thumbnail_size=40 ]
My Stuff and Annotation
![]()
It difficult to call an article about any annotation “complete” without at least a brief discussion of My Stuff capabilities. My Stuff is a term affectionately given to that little suit case, ![]() , icon in the top GUI row. As the name implies, it contains all your, “my stuff”. It allows you to see all your annotations in one place.
, icon in the top GUI row. As the name implies, it contains all your, “my stuff”. It allows you to see all your annotations in one place.
When a highlight is created, like any annotation type, it immediately populates a line item in the My Stuff->All Annotations listing. Annotations in this listing are distinguished by type according the icon at the left of the given line entry. Highlights have a pen icon,![]() . At this level, there are three ways to interact with a highlight line item:
. At this level, there are three ways to interact with a highlight line item:

- tap on the line entry
Tapping the line item itself will close the My Stuff GUI and open to display the highlighted text. - tap the blue configuration arrow
Tapping the rightmost blue configuration arrow allows the following edits to be made to the annoation:- Change Title
The default title, the location, can be changed to any custom title. - View Existing Tags
When an annotation is tagged, the Related Tags: section will show tags as buttons. Taping a tag will display a list of annotations that shares that tag. - Edit Tags
There are two types of tags: those that are user-created, and those from existing topics of the Resource Guide.
If you wish to use your custom tags, just tap the tag and a check mark will appear. If it does not exist yet, simply tap the Create New Tag button at the bottom of the page, once it’s created, be sure to tap to check it, so that it’s applied.
If you wish to tag according to the thousands of existing topics in the Resource Guide, you will need to type the first few letters of the desired tag. As you type, the list will be refined to match the typed pattern. Once you see the desired tag, tap-to-check it. - Change Category
A Category is nothing more than a folder. Categories can contain other categories, called sub-categories. The GUI behind Change Category also allows the creation and placement of categories. As the name implies, an annotation can me moved into a category for better organization. - Change Highlighter
This is the style that a highlight annotation was created with. It can be changed to use any highlight style that exist with a simple selection. - Delete Highlighter
No collection of editing tools would be complete without the ability to delete. There is a button for deleting annotations to complete the editing actions available.
- Change Title
- Swipe to Delete
Again, at the line entry level, annotations may be deleted with the standard Apple-swipe gesture.
My Stuff Exercise 1: Going to a Highlight Location from My Stuff
[Album: http://richimages.net/Albums/MyStuffHighlights01/ |width=640|height=640|photo_count=1|title_prefix=“Adding Custom Highlight Styles”|thumbnail_padding=0|thumbnail_size=40
My Stuff Exercise 2: Organizing Highlights by Folders
[Album: http://richimages.net/Albums/MyStuffHighlights02/ |width=640|height=640|photo_count=1|title_prefix=“Adding Custom Highlight Styles”|thumbnail_padding=0|thumbnail_size=25 ]
Multiple Organization Options — Categories and Tags
In exercise two, we used folders to perform some basic organization of highlight annotations. We grouped several appropriate verses from First John into a folder called Assurance Test. Using folders is great. However, this organization method is limited — an annotation may only reside in one folder. Suppose we were doing a study on lying. Some of our Assurance Test annotations could also belong in a folder called Lying. For example, look at these highlighted verses in First John chapter one:
verse 6. If we say we have fellowship with him while we walk in darkness, we lie and do not practice the truth.
verse 8. If we say we have no sin, we deceive ourselves and the truth is not in us.
We would like to connect these verses with the multiple topics — the topic of Assurance Test for salvation, and the topic of Lying. This is where we would use a second organizational method in BibleReader — tags. Exercise 3 below demonstrates the use of tags.
Note: For the above two exercises above, we viewed our highlights from the My Stuff->All Annotations section. My Stuff also contains segregated listing to isolate annotations by type; therefore, we may view highlights only by visiting My Stuff->Highlights. Additionally highlights are further divided by their styles. I.e., if you had a highlight style named Red Pen, you could view all those highlights by selecting that style. Exercise 3 will use this optional location, while demonstrating tags.
My Stuff Exercise 3: Organizing Highlights by Tagging
[Album: http://richimages.net/Albums/MyStuffHighlights03/ |width=640|height=640|photo_count=1|title_prefix=“Adding Custom Highlight Styles”|thumbnail_padding=0|thumbnail_size=20 ]
Syncing Highlights
Finally, a short word on syncing annotations to your Olive Tree account. When opening the My Stuff GUI you may have already noticed the large Sync button at the bottom. Tapping this button will sync all annotations between your iOS device and your Olive Tree account. If you do not yet have a login, you will be prompted to create one. Once your annotations are up to date, they may be easily transferred to another device by syncing it as well.

Along with syncing, Olive Tree is continuing development of a web utility. This utility currently allows viewing and some base editing features of the annotations in your Olive Tree account. If you have an EverNote account, it can create a notebook called, “Olive Tree” and transfer your annotations there. If you like XML files, your annotations can be backed up to your desktop. The web interface can be seen here. I plan to cover syncing and this utility in more detail at a later time.
Reviewing Highlighting Basics
Closing Thoughts
Obviously, those with the software probably didn’t learn anything from this article — the target audience are those new to the software. Long-time users may want to pass the link to friends as a convenient way to check-it-out. If you’ve found this article interesting, please consider digging a bit deeper by downloading the software and giving it a test spin. And, before anyone ask, No, I’m not an employee of Olive Tree, I simply enjoy touting and using this software.
Finally, drop me a line, I’d love to hear from you.
I am a brand new user to Bible Reader. I have watched and read most of the tutorials and am VERY impressed with the flexibility of the program on my ipad. I want to begin organizing but whant to do it right the first time. I’m a little fuzzy as to what I should make a highlight, note, bookmark or tag. Which is best for what purpose??
Would you please send me a link to your article on Olive Tree notes.
Thanks.
Tom
Sorry Tom,
Just saw this comment and, just now approved it. This article is quite old, and Olive Tree software has changed the organization a little (although all the functionality is still there.) I can’t remember what articles I wrote about notes. YouTube videos are probably a good source of information. OliveTree app also has a rotating series of very short target specific topic videos built into the app — pretty nice! You may be able to find what you’re looking for there as well.
If you had specific questions about notes … let me know. Hope that helps.